 Universal Bloggers
Photographer Matt Perry shows how to transform eye-catching cityscapes into breathtaking images while working harmoniously with the surroundings and city lights.
Combine natural light with artificial sources. Sony A7 III, 24-70 mm, 49 s at f / 14, ISO 100
Click here : High Resolution Images
Natural light
City landscapes look great during the golden hour of sunrise and sunset due to diffused, warm light. The same applies to the “blue hour” : the period before sunrise or immediately after sunset, when the sun goes low enough below the horizon, and the sky becomes blue, which becomes deeper, darker and richer, the further the sun recedes until the blue becomes in black. Examine and plan your shooting during the blue hour to get the most out of your lighting conditions. Canon EOS 5D Mark III, 16-35 mm, 13 s @ f / 16, ISO 100
Artificial light sources
During the blue hour, any artificial lighting will be noticeable. From the light of car headlights to lighting from office windows and street lamps, the city begins to take a different look, day turns into night. Illumination of architectural structures makes them look much more exciting and photogenic than in daylight. Similarly, in any cities located around bodies of water, lights will spread to the water in foggy reflections. Ultimately, those photographers who understand long exposure techniques and planning can use both natural and artificial light in tandem.
Planning
Determine the best angles of the scene for composing the composition, and also understand the accessibility and any restrictions that you may encounter when shooting. If you are photographing city lights , it is important to quickly determine the best exposure, since the dynamics between artificial and natural lighting are constantly changing. Then you will spend less time on post-processing. Some use bracketing, while others prefer not to merge pictures with different exposures, but to improve individual ones in post-processing.

Exposure triangle
Put the camera in manual mode and select the lowest standard ISO value (usually ISO 100); This will give you the cleanest images. Next, adjust the aperture. Depending on the scenario and what effect you are trying to achieve, if you are shooting a city landscape and want to keep the focus of the scene from front to back, try setting a narrow aperture between f / 11 and f / 16. With these settings, your ISO and aperture do not let much light into the camera. The shutter speed will completely depend on the amount of light in the scene, so this is initially a variable that you need to work with to get the desired shot.
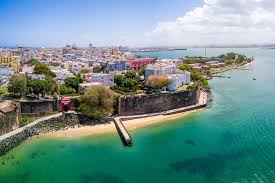
In low light conditions, a slower shutter speed is usually required to compensate for the low ISO and low aperture. This means that it is very important to use a tripod to keep the camera perfectly still. Any slight shift will affect the image and ruin it – this is obvious. Based on a standard cityscape shot, such as a picture taken in Seville, Spain (see pictures above), when changing lighting from sunset to blue hour, you will need to constantly adjust the shutter speed to compensate for diminished natural light and the resulting strong artificial light.
In this example, each image was taken at intervals of approximately 10 minutes with the same ISO and aperture values, with the shutter speed being the main variable. Lens filters were needed to contain the light in order to get a similar effect in water, however changing lighting conditions are easy to notice. Pay attention to how the natural light and color in the sky changes with the sunset, while artificial light becomes stronger, which creates more contrast in the darkening sky.
As you dive into the twilight of the sea, you may need a shutter speed of more than 30 seconds to get enough detail in the shade. Just switch to Bulb mode or increase your ISO a little or increase your aperture to reduce exposure.
Shooting Through Glass
Have you ever found yourself in a hotel room with stunning views of the city, in which the window did not open more than a couple of inches? Some cities have superb viewpoints from skyscrapers, hotels or church towers. But this often means that you have to shoot through thick glass , which can be a real test for long exposure for a blue hour or at night. Dirty or scratched glass, especially on the outside, will affect the final image, and this will complicate post-processing.
Another problem is reflections caused by internal lighting. First, find the cleanest section of the window that opens you to the composition you’re looking for. Shoot as close and even as possible to the glass (but avoid touching the lens and glass). A polarizing filter will help reduce some reflections, but this is often not enough. If possible, turn off any lighting in the room or cover something with a source so that the light does not enter the window. Use a lens hood, it can also be attached to the window using suction cups.
Abstract city landscapes
As the sky darkens, experiment with focal lengths. Do not feel the need to include the entire scene or sky in the composition: what you skip is as important as what you include in the frame. Use a telephoto lens or neat crop in post-processing.
Turn on people
The inclusion of people in the composition of urban scenes is sometimes inevitable, but this can give the picture both scale and context. By mixing architectural photography with street photography , you can create stunning shots that are more dynamic or interesting than a photograph without people.
Bad weather
Shooting long exposures in bad weather is undoubtedly a difficult task, however, if you can protect the lens from rain during the entire exposure time, you can get really strong shots, because the dark sky or wet sidewalks add drama to the scene.
Trails
Car headlights are an ideal subject for shooting light trails in the blue hour. When shooting in Bulb mode, open the shutter before the light source enters the frame and close it as soon as it completely leaves the frame after reaching the correct exposure.
Star flares
A slow shutter speed with a shutter speed of about f / 16 should give you a good splash. In addition, the more aperture blades in the lens, the brighter and more spectacular the view.
Bokeh
An interesting effect will come out when shooting city lights, if you bring the scene out of focus so that the lights take on a circular bokeh look. Compose, make sure you are in manual focus mode, and then adjust the focus.
Optional equipment
Tripod
Despite the fact that many modern cameras can take great pictures in low light, for really clear, clean shots of city lights, you need the stability and flexibility that a sturdy tripod provides .
Mini tripod
There are circumstances or places where a full-size tripod is either not permitted or inappropriate. Alternatively, a more robust, smaller desktop tripod .
Filters
If you shoot city lights during sunset or the blue hour, then filters can be especially useful . A circular polarizer is great for working with reflections, and ND and ND Grad filters allow you to manipulate natural light to get your desired shots.
For more information visit our website ImagesMall.com